(Without Buying More Flowers)
We’ve all done it.
You grab a bouquet while you’re out. That bunch of tulips at Metro caught your eye, or maybe the potted hyacinths — a mixed bunch from Safeway just because it made you smile. A touch of spring to chase away all the snow outside. You bring it home, pop it in a vase… and something feels off.
The flowers are pretty.
But the arrangement? Not quite.
Here’s the good news:
Even grocery store flowers can look amazing if you style them well!
Professional Arrangments Are About More Than The Blooms
What makes a florist arrangement feel “special” isn’t just the blooms — it’s:
- shape/texture
- movement
- spacing/height
- and a little bit of restraint
Most grocery store bouquets fail because they’re:
- too tight
- too even
- just dropped straight into a vase as-is
We can fix that in about five minutes. It’s easier than you think — no experience needed. Just a few quick tips and coaching your aesthetics to create what appeals to you.
Step 1: Start by Taking It Apart
Hey – it caught your eye initially but now you’re home and it’s not quite right. So, let’s start over. Take off the plastic wrapping and paper, separate all the stems into like piles by colour or variety or even shape.
Strip away any leaves that will sit under the water line. Lay everything out. (some extra supplies that may be useful would be a rubber band and a sharp knife or scissors)
Step 2: Choose the Right Vase (This Matters More Than You Think)
Now — pick a container. A vase. A mug. A beer glass (because you like the clear glass, but it’s narrower than most vases) – whatever suits your aesthetic.
Do you want something that will disappear so the bouquet shines? Classic clear glass or plain porcelain or ceramic vase is just what you’re looking for. Maybe you want an additional pop of colour to enhance or contrast the flowers, or tie into your room aesthetics. Play around with it. There’s no right or wrong, and you can change your mind later. That’s allowed.
Things to keep in mind — smaller bouquets are swallowed up by large vases. Choose a container that’s got a narrow enough opening to ensure the stems stand upright. This helps with shaping. We like to pair the shape of the bloom with the vase shape. Hydrangeas are very full round shapes, so shorter round vases pair well with them. If you have long-stemmed blooms (like roses), a tall narrow cylinder might be just the ticket.
For a looser wildflower look, use a vase slightly too large for the bouquet to add space. For a classic, full look use a vase that’s going to help the stems stand upright. Fill the vase with fresh water, and if you received flower food with your flowers, go ahead and add half or the whole package to the water.
Your north-star here is: A too-large vase = floppy, lifeless flowers.
Step 3: Build The Base Of The Bouquet
There’s a few different ways to start building a bouquet, but if you’re beginning with a vase, we like to start with the greenery. Most grocery store bouquets (and Bloomstead bouquets) are going to have greenery of some sort.
Place 3-5 greenery stems in your vase to form a tripod. This loose criss-cross pattern creates a structure in which to slide other stems into so they stay where you put them. As you place them, give the ends a quick snip on a slant to help ensure they can take up more water.
Alternatively, maybe your bouquet came with a really thick full bloom – we love to use hydrangeas for this. Place the hydrangea blooms in the vase first to form a base. (If they are sinking too low, try tying a rubber band loosely around the stems and then putting them in the vase.)
However you start, place the base stems in your vase to form a tripod. This loose criss-cross pattern creates a structure in which to slide other stems into so they stay where you put them. (You can also use floral foam or a flower frog to help stems stay where you put them.)
You’re not filling space — you’re creating a support structure that will hold everything else up. We like to work with the rule of 3s. Start with three greenery stems if you have that many.

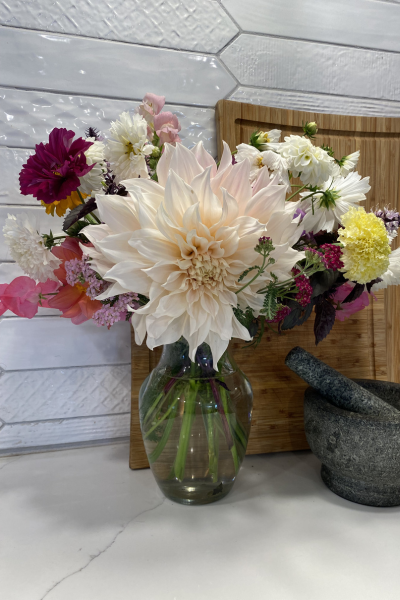
Step 4: Add Your Main Flowers — Create Shape
Now bring in your focal flowers. These are the showstopping blooms — probably the ones that caught your eye to begin with. Start with one or two in the middle at different heights. Add one on each side of the vase, maybe group two together on each side. Again, use different stem lengths to create shape.
Quick tip, hold the stem up against the vase about where you’d like the bloom to sit, and then snip accordingly. You’re going to give the stem a fresh snip anyway, so let’s add some shape:
- let a few sit lower
- let one or two reach slightly higher
- turn blooms outward so they “face” different directions
If you want your bouquet to be seen from all sides, be sure to turn your vase as you work. Notice the shape of the blooms. Pair round tight blooms with looser or open blooms. Use tall spikes (like delphinium, stock, snapdragons) to add height. Florists rarely create a perfect dome because nature is rarely uniform or perfect.
Step 5: Leave Space (This Is the Secret)
Now add the filler flowers. These are going to be the smaller blooms, the blooms that take up space to fill gaps. Slide them in just where you think they look good — again, snipping the stems and varying the height. The instinct is to make it full. Resist that.
A bouquet from The Bloomstead is typically going to have 15-20 stems. A bouquet from your grocery store is going to vary by size quite a lot. Over-stuffing the vase is going to crowd the blooms, and you want them to shine.
A florist-style arrangement has breathing room:
- not every gap needs to be filled
- not every flower needs to be visible from every angle
That space is what makes it feel elevated instead of crowded.
Step 7: Let It Be Slightly Imperfect
This is where most people fuss and move stems over and over. Take a step back and look at the shape. Where are there big gaps? Make some minor adjustments, but remember not every space needs to be filled. Allow room for the blooms to open more fully as they age in the vase.
Depending on your aesthetic, as the bouquet ages, remove the spent blooms and continue to rearrange to compensate for the holes that are created. If you want that classic, very full arrangement, as the bouquet ages, downsize your vase instead of tossing the still-good blooms because it doesn’t look full any longer.
Why This Works
When flowers are arranged this way, they:
- catch your eye when you walk into a room
- feel calm instead of cluttered
- look more like something you chose, not just something you bought
And that’s the whole goal.
A Small Upgrade That Makes a Big Difference
Instead of waiting for a “special occasion,” you start creating small moments of beauty during the week.
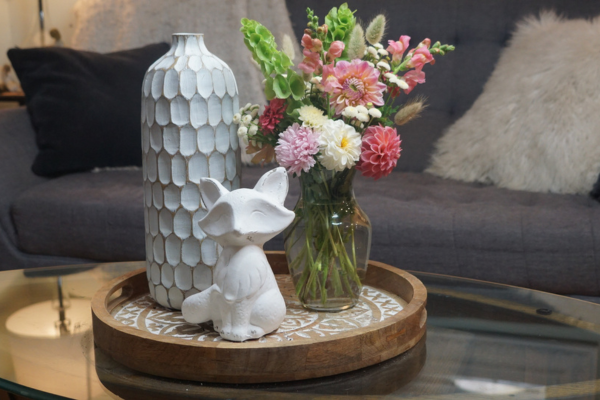
A simple bouquet on the kitchen table. A few stems by the sink. Something soft and seasonal near a window. Pair linen ribbons with your vase. Add the vase to a tray with other decor to create a moment. Your flowers should be as curated as your space.
If you’re in Thunder Bay in summer, find us every Saturday at the market. Our bouquets are designed for exactly this kind of everyday beauty.
Until then, start with what you have. You might be surprised how good it can look.
Keep Blooming!
Lisa and Jenna
One thought on "Elevate Your Flower Arrangements in Minutes"